Installing Curved Corners
Corners in a layout are what they are, but often can be a distraction for a well designed layout. I reviewed the thin plywood and wet sheet rock approaches, but didn’t like either for a variety of reasons, namely time and the mess created to install. Looking for a hard and rigid material, I experimented with both laminate and linoleum, and was pleased with the results. Your choice of course might be driven by availability and cost, but in my build, it was free.
When laying out the corner measurements, the ‘width’ dimensions for the two materials are slightly different and this is due to the thickness and the subsequent ‘mudding’ of the seams. The linoleum should be cut to 20-21″ wide and the walls marked at 12″ from the left and right of the corner. The laminate should be cut 22-23″ wide and the walls marked to 14″ from the left and right of the corner. When marking the vertical installation lines make sure to use a 4′ level. Remember corners are seldom straight or at 90 degrees.
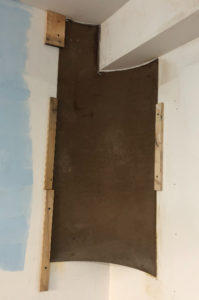
(Back side of laminate shown)
Once installed, the finish work is crucial as your lighting will pick up shadows if not done well. There are two must do steps. The first is to use adhesive webbing tape and the second is using Durham’s Water Putty for the base coats. Sheetrock mud is soft compared to the linoleum and laminate and can chip out, even with tape. Durham’s dries very hard, but is also easily sanded. A coat of ‘mud’ can be used for the final skim coat.

PLASTER MOUNTAIN DIRECTIONS:
Cutting Tools:
** Laminate: box knife and straight edge.
** Linoleum: laminate cutter and straight edge or jig saw with fine metal cutting blade.
Preparation: measure walls twice, mark and cut. Sand the left and right edges of the material (side facing wall) so glue will ‘grab’ surface.
Glue: best results were achieved with acrylic tile adhesive, which cleans up with a damp rag.
Installation: temporarily install guides on the left and right vertical installation marks. Spread adhesive using a 2″ wide putty knife or thin piece of lauan plywood. Insert laminate/linoleum between guides.
Clamping: screw a block of wood to clamp material flat if walls are uneven.
Drying: let glue dry for 24 hours and remove installation guides and block clamps.
Mudding: apply adhesive webbing tape and Durhams water putty for the base coats.
Cleanup: bucket of water to wash your hands and tools.
To see more of the Fitchburg Railroad On30 build, visit us on Facebook.


